Sunday, April 13, 2014

Pin Wheels

Today I am planning to design a pin wheel project!

Here is my process and my research:

First, a website that I found while google image browsing on pinwheel crafts. I like to use google images as a starting point for two main reasons, one I want to see if the craft has been done before, and two because I need to see the basic construction of a pinwheel, so that I can later use that basic blueprint and invent a craft of my own that is customized to fit the interests of kids depending on the event, or in a setting where I know the kids' interests.


Check out these fun pin wheels!

From:  http://www.yokebakery.com/diy/tag/wind-crafts/

(Photo from www.yokebakery.com)


 This new project involves many componants...

I was asked to choose a craft that would be appealing to passerbyers, and that is not too messy.

Non- Messy crafts are a real thing lol. It just takes a lot of organization and multitasking, and most of all be confident in your craft.

If the craft simply does not work and the end result falls apart, then you are in trouble because the kids won't be happy and then you won't be happy.

A well designed craft is tested out before hand, if not tested before hand problems could arise in the very beginning and it can stall time. A craft can often be improvised, but the improvising is strongest when you use materials that you already know very well. Knowing your materials is highly importamt. If you know your materials and their properties, for example, scotch tape on wet paint...doesn't work, because the adhesive on the tape looses its grip and will never hold down what you are trying to make stay down, which will result in a dissapointed and frustrated crafter.


So the women who told me more about the event that this craft will participate in had an idea to make flowers. So keeping her idea in mind, I decided to add another componant to the ordinary paper flower.

Many ways to make a paper flower: the good old tissue paper and pipe cleaner combo, next is the same ole' construction paper cut out of parts of a flower that are glued together...boring but cute, well...how about something that combines part flower and part invention. In other words, how about adding movement to the flower.

So we have it, a sunflower pinwheel.

To my curiosity I googled "sunflower pinwheels" and found this website:

This page specifically addresses materials and instructions on how to make a pinwheel and a sunflower combined. which helps me decide and customize my own craft.


http://www.firstpalette.com/Craft_themes/Nature/flowerpinwheel/flowerpinwheel.html


I found after researching this craft that I will run into a few problems...

1) finding green straws
2) being able to teach many kids and families at once the folding process of the propeller part of the pinwheel. At a public arts and crafts table, sometimes it is best and less stressful on the teacher to provide a craft that is not too complex in its number of steps.
3) I will have to find a solution to poking the whole in the middle, that means I will have to monitor a sharp pin tool at the crafts table, and that is just one extra elemement of the craft that I have to do single handedly, there fore I have to take into consideration my tools that I will have to monitor at the table.
4) Many steps to a craft = intimidation, the last thing I want to do is scare kids away from making a craft because they feel as though it is very complicated to make. All public crafts should take simple steps and be very inviting for all ability levels.


Thursday, March 14, 2013

New Post!

Hello Viewer,


Today, the kids and I will be making the a giant popsicle stick building!


For research I googled a few images, and found some interesting blogs and websites that post examples of what I want the building to look like when it is finished. In my research I also look for an easy process that I can learn and in turn teach to my students. Once I learn the proper and basic way to make a strong popsicle stick building, I will take that basic lesson and apply it to this project and guide students on what to do. 
In other words, I am using simple well designed and easy step lessons that I found on youtube and google. I am very visual and I like lessons that provide pictures but also typed instructions. I always find learning the basics builds a strong foundation, and I can then execute a well designed craft lesson.

For example:

This image explains quite a bit, I see how this person built these, I know how many popsicle sticks were used, and what adhesive worked well. I see how they resolves the interior corners of the structures.

I will use this to help myself guide students throughout the lesson. 

Now the process may change completely as we start to make this. We may add other materials to the building and just have fun with it.

I plan to have them mix their own colors that relate to the overall look. They love to mix paint, mixing paint is discovery based so I always let them mix two or more colors together to let them discover what the color will come out to. (Because I myself wonder sometimes what the colors will turn out to be.)


For the final look of the building I will add the finishing details only because I have a specific building that I want it to look like...

Here is a picture:


Now, I find that if I tell my students that we are making this specific building that they will get pretty stressed out, through experience I know this. So, I am just going to tell them that I have special challenge for them, that we are going to make a giant popsicle stick building, and by "giant" I mean a bit larger than the average popsicle stick log cabin size, so it will not be life size. I will post pictures later. To show you what I mean. I am going to film the process, and place the video in my Senior thesis project. As a final reward for them helping me, I will tell them that the building will to on display for the Senior Show, and that next week they will make their own miniature buildings.  


Anyways, 


Here are some websites that I found in my research:


http://karorichildrenclasses.wordpress.com
(I found a photo of a popsicle stick house, and stumbled upon her blog about kids learning, its great!)


http://mordheim.ashtonsanders.com/tag/popsicle-sticks/
(pretty cool buildings)


Okay time to go teach!


The Final Results! Like I stated before...the project changed immensley!

 I look at arts and crafts as a journey through exploration, discovery and not focussing on a strict end result, leaving a visual self expression of the process for viewers to see.


The Nazzaro Community Center
created this basketball court, the center is known for its sports program and for being creative while focussing on activities that the kids are passionate about.

I told the kids that we were going to make a mini model of the Nazzaro Center keeping in mind that the end result will be decided along the way, so I did not slap or write in stone that the final look was going to be an exact replica from the picture I printed out.

Let me ask you this question,

which one feels more interesting?

 this one?


or


This one:


Like my motto of this blog, "Art is in the Eye of the beholder" I stand by this dreamy basketball court. The colors were hand mixed by the kids. I played my part by specifically laying out a few plates with specific colors on them, unmixed. But the point was to have the kids could customize their own recipies of how what colors to mix, I told them that they could experiment with the colors I provided.

I think often the expectation of art is too controlled, too uptight, and I mean it the way I say it. I am talking about the end result, my job is to say when to stop, and to guide them along the way, and to some extent control certain aspects of their projects. I am always in control, but I let them discover and express ideas, I give them constructive criticism when I feel they can push it to another level.

Art is a journey, not a dead end.

I was taught to explore as much as I possibly can with materials, and to most of all be expressive. in teaching I am trying to create that persona of art with the kids I work with. Art is a place where you can explore ideas, "it is your place", just like owning a personal journal, you can write or express anything you want. The freedom of expression and experimentation helps the mind sort out personal issues, it is a release.

So, have confidence in your artwork, express, experiment, discover, answer questions. 

Best,

T

Tuesday, January 8, 2013

Community Art - Dream becomes reality and more.

Let me just tell you that this project has brought more excitement than I could ever imagine. I know I have not been posting more documentation of my process while working with the kids on this project, due to being away from work during the holidays (in New Mexic with family), but also due to the lack of confidence that the project will work...yes, I know...tisk tisk to losing confidence here and there for a project I so badly want to fully develope, but...listen to what is the current mind set that I am in because today was amazng and I will show you why.... I realized in my last post I was sad for many reasons...but I was looking at it the wrong way....and I admit to these feelings here because I want readers who are trying to do what I am doing (planning art projects for kids) that there are ups and downs to every project, and I am not perfect I like sharing things that I have learned. Hope it helps btw.

So the last post was...negative thinking, and I was sad because the project didn't quite start where I hoped it would...but that was due to being impatient, I was trying to slap a strict time frame (on myself) to get the project completed because I just simply wanted to see if I could....but to be impatient is never a good thing. The point of doing this art project is for the kids to have fun...if I was always impatient and dictating their pace thats my fault for not loosening up, letting them be in free flowing mind set (which is the recipe for creativity to happen) is utlimately letting nature take its course. I had to suck up my negative feelings and readjust my expectations. thats called growth :) learning from trial and error

This post is...positivite, casting a wider outlook, seeing/witnessing amazing things starting to happen, adjective: exicitement,  also theres a plethera of patience that I have this time. Key words (for what is making this project successful): TIME to give the kids time to develope ideas, because each day the kids do different things to the project AND each day their motiviation increases. PATIENCE is another obviously, to keep telling myself that patience makes me slow down, and when you slow down you see  more, and the more you see the more you more grow, healthy growth needs more time. CONFIDENCE is the other because it keeps me calm to know what I am doing and allows me to direct many kids in a fast pace environment smoothley. Finally, CREATIVITY is my philosophy, my definition of creativity is: a relm of thought that is able to consider any possibilities with out interuption or derailment of an idea developing in motion, where anything considered impractical is imaginable, is possible, and in turn anything imaginable can become possible in reality. Example, a kid is given paint and a paintbrush, I turn away to talk to someone, and while my back is facing the kid, him or her decides to paint his or her hand, stamps it down on a surface, then paints a stem from their hand imprint and creates a flower. Boom, idea has been born.  (All within a couple of seconds because ideas that are acted out impulsively are as they say "spur of the moment." The definition of spur of the moment is in fact: on impulse; without premeditation.)    

So, this morning here is the progress that has been made without trying to control so much, like I did in the first week...pictures :)


Wednesday, December 12, 2012

Props! and Good Ideas!

Grave stone for A Christmas Story inspired play,
                                                                       
                                                                         Front

Back


Bouquet of flowers for a Dance Recital! ( A lot of work went into these, all hand work by a few kids) 


Front
Back (Below: I asked for them to draw designs on the tissue paper to make the wrapping look like professionally gift wrapped flowers that you would get at the grocery store.) 
                                                                              
                                                                 All Together!

This 11 year old came up with these Stayrafoam turtles made out of the school lunch trays. All her friends wanted one, so she had a small business of making these... all credit goes to her...just thought I would share a great idea!   
                                        
                                        
                                                         The End... :) 

Monday, December 10, 2012

Fake Flowers for a Dance Recital!

TODAY

The kids I work with are having a Dance Recital!


I was asked to make fake flowers with them so that they can throw the flowers out into the audience at the end of a dance routine.

So...

In order to find out how to go about making them I had to do some research. If you are a craft buff then you will find this research helpful, if you are looking for craft ideas.


My goal is to make light weight, easy to make step by step flowers either with tissue paper or duck tape.


First, duck tape roses:

                                              (Photo From:  http://www.duckbrand.com)

Step by step - how to make petals and wrap them around a stem. For the stem this website used a straw and wrapped some green duck tape around the straw...brilliant! That solves the light weight riddle for me.

http://www.duckbrand.com/Home/Duck%20Tape%20Club/ducktivities/flowers-and-roses/How%20to%20Make%20a%20Duck%20Tape%20Rose.aspx


But...I am still curious about tissue paper flowers....so lets see what I found:


Note: I like really simple steps...laid out with pictures of course! I am very picture oriented, and I feel like a good instruction includes images. Videos are also pretty awesome references! (video below)


                                                                      (Photo Courtesy of http://crafts.kaboose.com/flower2.html)
Tissue Paper Flowers:
http://www.youtube.com/watch?v=lXNeVq2RxFU

For this Project.. I CHOOSE TISSUE PAPER! :)

The tissue paper is perfect for throwing (it will not scratch or injure anyone in the audience because they are planning to throw the flowers individually.) Tissue paper is also just what I have in the closet and is perfect for making flowers fast and in different colors.

(I will use the duck tape roses for another project later for another lesson.)

The website uses string...however...for my project
Instead of using string, I will use pipe cleaners for the stems, since I have a brand new package of pipe cleaners at work! ALSO: since my goal is to make two bouquets of flowers, just like you get a bouquet wrapped at the grocery store, I will have students decorate two plain sheets of white tissue paper and help them wrap the paper flowers

Friday, December 7, 2012

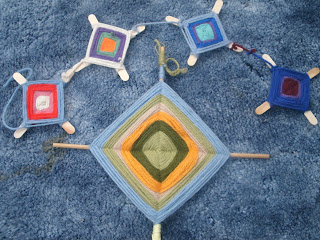
Making God's Eyes Today!

Remember These?
               (Photo From: http://mycreativelife101.blogspot.com/2012/07/gods-eye-weaving.html)


Planning to make these today with the kids..did some research on God's Eyes... :) This is what I found... :)                                                                                                                                  

Great Website for How to Make God's Eyes.

How to make a basic one with a loop knot:
http://www.caron-net.com/kidfiles/kidsapr.html


With Beads!
http://gingerbreadsnowflakes.com/node/73


It is the Holiday Season! Check out Chickabug's way of getting into the Holiday Spirit!

 http://www.chickabug.com/blog/2011/12/diy-miniature-gods-eyes.html


The Color Scheme is Beautiful in this one, but here is some history about "Ojo de dios" aka God Eye's:
"Ojo de dios is a traditional Mexican craft for good fortune. Kids enjoy making Ojo de dios on Cinco de Mayo. Cinco de Mayo is celebrated in US as a day of Mexican heritage and pride.

The Ojo de Dios or God’s eye is a ritual tool, magical object, and cultural symbol evoking the weaving motif and its spiritual associations. For the Huichol peoples of western Mexico, the God’s Eye is symbolic of the power of seeing and understanding that which is unknown, The Mystery. The four points represent the elemental processes earth, fire, air, and water. [Source: Wikipedia]"
I found this information at this site (a great site also!):
http://www.myscrawls.com/crafts/ojo-de-dios-eye-of-god